Feeds:
Posts
Comments

Basil Lemon Shrimp Linguine

I think the best recommendation I can give this Basil-Lemon Shrimp Linguine is that I liked it so much, I made it for my mother-in-law when she came to visit our house for the first time. It’s easy, delicious, and rather elegant, if I do say so myself. It’s also the kind of dish that allows you to gather all the ingredients and be totally ready for a 5-minute meal assembly when guests — as in, in-laws — arrive, or when everyone is finally ready to eat. Basil Lemon Shrimp Linguine is no-stress, delicious… and at least looks sophisticated.

This would be a perfect summer meal, since the basil and the fresh lemon are flavors we usually associate with summer. Nevertheless, we found some basil at Trader Joe’s that was cheap enough to get without shorting our landlord on the rent (herbs are just so expensive in Chicago in February… this IS the summer I am going to start an indoor herb garden…).

I found the recipe at Dine & Dish, a really lovely food blog, but I have gotten in the habit of taking many liberties with the proportions, since we found the original ratio to be really butter-heavy — and you know that if I find a sauce butter-heavy, it probably is, because I can usually never get enough butter 🙂 . The results of our experimenting are reflected in the recipe below — try it our way, and then tinker with it yourself to find your favorite flavor!

Basil Lemon Shrimp Linguine

Adapted from Dine & Dish

Serves 4.

  • 2/3 lb. (12 oz.) whole wheat linguine or other long pasta
  • 1 lb. cooked shrimp, thawed and drained (I took some raw shrimp, dunked them in a pot of cold water, turned up the burner to high, and around the time the water boiled, the shrimp were done. Rinse them in a colander with cold water to stop the cooking, and you’re ready to go.)
  • 3 ½ tablespoons unsalted butter, melted
  • ¼ cup fresh lemon juice (from about 1.5 or 2 lemons)
  • 2 tablespoons fresh basil leaves, julienned
  • 3 garlic cloves, minced
  • ½ teaspoon salt
  • ½ teaspoon fresh ground black pepper
  • 1/3 cup parmesan cheese, grated

Cook pasta in a large pan of salted, boiling water until al dente. Add shrimp and drain immediately, then return pasta mixture to the pan.

While the pasta cooks, combine melted butter, lemon juice, basil leaves, garlic, salt, and pepper to make the sauce.

When the pasta and shrimp are done, toss with the sauce in the pan, or even right in your serving dish. Sprinkle the parmesan cheese over pasta and serve immediately.

Chocolate Stout Cake

Chocolate Stout Cake

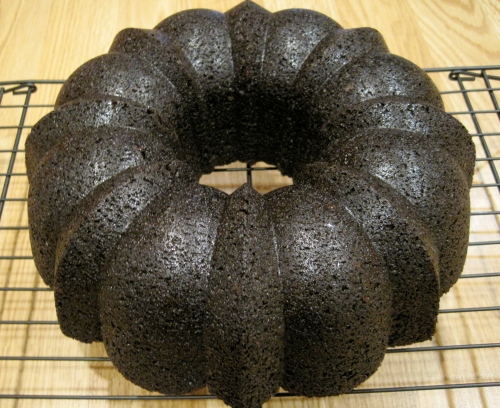
A week like this deserves a cake like this, and that’s all I have to say about that.

Dense, moist (for at least a week post-bake), and so rich it’s almost bitter, this is a chocolate cake and then some. There are two things I love about this cake, that make it stand out from other chocolate cakes I have made in my life, including the behemoth birthday cake 2010.

1. The texture. As I said, this cake is moist and stays moist (I’m having luck with that lately, since this was also the case with the Chai-Spiced Apple Cake). I think it’s the sour cream. This Chocolate Stout Cake is tender, not tough, and for a cake with such rich flavor, there is a certain amount of airiness going on in the crumb. I’m thinking that might have something to do with the carbonation in the stout? In any case, it makes the cake really soft but substantial.

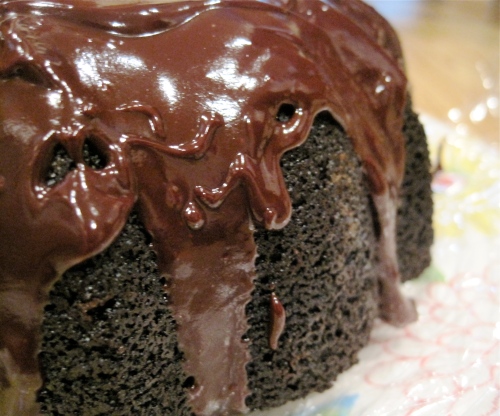
2. The taste. This is Chocolate Cake 2.0. I couldn’t get enough of the flavor because (gasp!) there is more going on than just chocolate. The stout adds bitterness and body to the taste without taking away from the fabulous cocoa flavor (for how I feel about cocoa, check out these brownies). Adding a coffee-laced ganache adds just another subtle layer of flavor that just makes the whole thing taste more sophisticated.

Chocolate Stout Cake

Imagine my delight when it came out of the pan... whole!

This cake is brought to you by smitten kitchen… but actually, it was brought to me by one of my students, who had promised to bring my colleague and me lunch one day. Lunch was apparently a kitchen fail, but she brought this cake to say she was sorry, and I not only forgave her instantly, but promised myself I would someday make it!

Finally, a note to my mom: the cake tastes nothing like beer, the ganache tastes nothing like coffee (I know, you don’t like either flavor). And if you are worried about buying these ingredient and never finishing them, just save them until Sean and I come home. Miss you!

Chocolate Stout Cake

Chocolate Stout Cake

Adapted from smitten kitchen, who adapted it from the Barrington Brewery via Bon Appetite

Cake ingredients:

  • 1 cup stout (we actually used oatmeal stout, go figure)
  • 1 cup (2 sticks) unsalted butter
  • 3/4 cup unsweetened cocoa powder (people prefer Dutch-process, I used the old faithful, Hershey’s Special Dark)
  • 2 cups all purpose flour
  • 2 cups granulated sugar
  • 1 ½ teaspoons baking soda
  • ¾ teaspoon salt
  • 2 large eggs
  • 2/3 cup sour cream (I used light)

For the ganache:

  • 6 ounces semisweet chocolate chips
  • 6 tablespoons heavy cream
  • 1 teaspoon instant coffee granules

Preheat the oven to 350°F. Spray a bundt pan well – really well, people, don’t skimp on the Pam. I have been known to brush the inside of my bundt pan with melted butter, and this time I actually both sprayed and brushed. Call me crazy, but you see, my cake came out of the pan, so in Bridezilla vs. Bundt, I won.

Bring 1 cup stout and 1 cup butter to simmer in heavy large saucepan over medium heat. Add cocoa powder and whisk until mixture is reasonably well combined. The original recipe says the mixture should be smooth but I couldn’t get a totally even texture, and suffered no ill consequences. Cool slightly.

Sift flour, sugar, baking soda, and salt together in large bowl. Using an electric mixer or stand mixer, beat eggs and sour cream in another large bowl to blend. Add stout-chocolate mixture to egg mixture and beat just to combine. Add flour mixture and beat briefly on low. Using a rubber spatula, fold batter until completely combined.

Pour batter into prepared pan. Bake cake until a toothpick or cake tester inserted into center comes out clean, about 35 minutes. Transfer cake to rack; cool completely in the bundt pan, then turn cake out onto rack.

Ganache:

Melt the chocolate, heavy cream, and instant coffee in the top of a double boiler over simmering water until smooth and warm, stirring. Don’t overheat, but make sure you let it get hot enough that it will pour evenly. Drizzle over the top of the cooled cake.

Sweet and Sour Chicken

Sweet and Sour Chicken

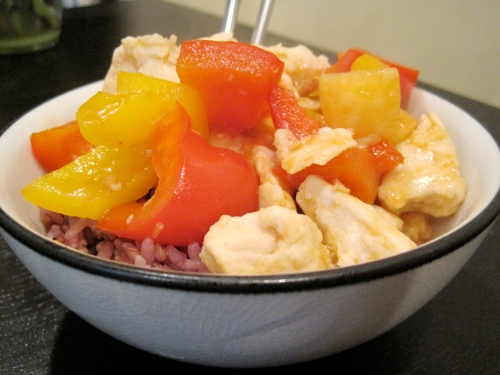
Happy Wednesday, and welcome to one of our favorite quick-fix dinners, the source of many happy lunches of leftovers! I’ve made this Sweet and Sour Chicken several times, and each time we have happily enjoyed the satisfying, tangy-sweet-savory dinner followed by a few lunches that leave coworkers hungry and envious (mwahaha….).

The irony is, I actually never order Sweet and Sour Chicken when I’m in a Chinese restaurant. I find the scary/squishy breading and thick, ketchupy sauce a little alarming and… surreal. You know the Michael Pollan mantra — eat food, not too much, mostly plants? Most restaurant versions of Sweet and Sour Chicken don’t really fit that rule. Especially if it comes off a cafeteria-style assembly line of different Chinese dishes that all look suspiciously similar… you know what I’m talking about.

But just because many versions of Sweet and Sour Chicken are unhealthy and weird, doesn’t mean that the basic flavor profile — ketchup, vinegar, ginger, pineapples — is fundamentally flawed. There is a reason why people flock to the mall to eat this stuff — we all like the sweet and sour flavor combo, we just can’t find a version that doesn’t contain all our saturated fat content we need for the first three months of the year.

This Sweet and Sour Chicken has that familiar flavor profile, and even retains a satisfying coating on the chicken, without the scariness of deep-frying. The recipe comes from a guest post on Simply Recipes by Jaden Hair, who also writes a wonderfully amusing food blog of her own. As I said, I’ve made this recipe several times and have adjusted it below to reflect our favorite proportions. We love a lot of ginger and don’t use as much sugar as the original recipe recommends — the ingredient list below reflect those preferences — but really, the exact proportions are up to you and your tastes!

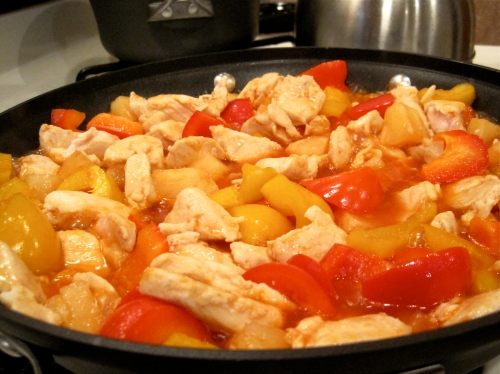
This is a very quick fix — I mix all the sauce ingredients in one 4-cup measuring cup while the chicken is marinating. The sauce will thicken as it cooks, and again as it cools (another reason why this makes such great leftovers!). If you like a thicker sauce, add a teaspoon or two of cornstarch to the sauce — this is meant to be a healthier Sweet and Sour Chicken, and I suspect that’s why it doesn’t use cornstarch in the sauce like so many other stir fry recipes do.

Sweet and Sour Chicken — Adapted from Jaden Hair, on Simply Recipes

Serves four.

  • 1 ¼ lb. boneless and skinless chicken thighs or breasts, cut into 1″ chunks
  • 2 egg whites
  • ½ teaspoon salt
  • 3 teaspoons cornstarch
  • 1 20-ounce can pineapple chunks (keep the juice!)
  • ½ cup juice from the canned pineapple
  • ½ cup white vinegar
  • ½ cup ketchup
  • ¼ teaspoon kosher salt (1/4 teaspoon table salt)
  • 3 tablespoons brown sugar
  • 2 tablespoons neutral cooking oil
  • 1 red bell pepper, cut into 1 inch chunks
  • 1 yellow bell pepper, cut into 1 inch chunks
  • 1 tablespoon fresh ginger, minced

In a bowl, whisk together the egg whites, salt and cornstarch. Add the chicken and stir to coat the chicken. Let sit for 15 minutes at room temperature or up to overnight in the refrigerator.

To make the sauce, whisk together the pineapple juice, vinegar, ketchup, salt, and brown sugar – make this easier by measuring all sauce ingredients into the same 4-cup measuring cup, in the order in which they are listed above.

Heat a large frying pan or wok over high heat (Jaden explains that you’ll know it’s hot enough when you flick a drop of water onto the pan, and it sizzles and evaporates). Add 1 tablespoon of cooking oil and swirl to coat the pan. Add the chicken and spread it evenly so that it browns in one layer. Leave the chicken untouched for 1 minute, or until the bottoms are browned. Flip and brown the other side for around 1 minute. Don’t let the chicken cook through – it should still be pink in the middle. Dish out the chicken onto a clean plate and set aside.

Turn the heat down to medium and add the remaining 1 tablespoon of cooking oil. Let the oil heat up and then add the bell pepper chunks and ginger. Fry for 1 minute. Add the pineapple chunks and the sweet and sour sauce. Stir well to combine. Turn the heat to high and let the sauce come to a simmer. Then add the chicken back in and stir to combine. Let the whole thing simmer for 1-2 minutes, until the chicken is cooked through.

You’ll know the chicken is done when you cut into a piece and it’s not pink in the middle, and at this point the dish is ready to eat. However, you may want to let the Sweet and Sour Chicken simmer for a few more minutes, to let the flavors combine and the sauce thicken. Serve with hot rice.

Chai-Spiced Apple Cake

Chai-Spiced Apple Cake

Guys, I have been waiting on the edge of my seat for this post! Last weekend, while scanning my saved recipes and pondering what to make for a Super Bowl party, I began dreaming about making a chai-spiced apple cake. As soon as I got the idea, I couldn’t get it out of my head. So I made it… and once I made it, I could hardly wait to write about it! Spiced apples are themselves a beautiful thing, but adding the chai flavor, and then baking it all into a beautifully rustic, sour cream-based cake… people, this stuff is good. I have been eagerly anticipating being able to share this recipe with you — I can’t wait for someone else to try it!

Two recipes for apple cakes found on two of my favorite blogs inspired this chai-spiced wonder cake. The first was Joy the Baker’s Spiced Apple Cake, which looked awesome & easy — and I loved the idea of using a spring-form pan. Cakes are just cleaner in spring-form pans 🙂 In terms of flavor, though, I was looking for something with a different mix of spices — I don’t love fresh nutmeg, don’t own allspice (and at a 1/2 teaspoon, is it really worth substituting?), etc. Without those spices, though, I didn’t think my cake would have a strong enough flavor kick.

The other apple cake inspiration was Ezra Pound Cake’s Chai-Apple Pie Coffee Cake, which had the inspirational idea of using chai latte concentrate to flavor both the apples and the cake. Bingo! But coffee cake wasn’t what I was going for — we were headed to a Superbowl party, not brunch — and let’s face it, Joy’s recipe uses both sour cream and four egg yolks. All that moisture (and fat…) in my chai-spiced apple cake? Yes please. I wasn’t about to give that up.

Chai-Spiced Apple Cake

And so the Chai-Spiced Apple Cake was born… a happy blend of both recipes, with a little bit of Bridezilla thrown in there. This was one of those amazing times when an experiment turns out just perfectly the first time around. First, the texture is perfect. It’s tender with a thin crust that has just the right amount of delicate crunch, especially on the top of the cake, where the cinnamon sugar really makes it sparkle.  And it’s moist — and it stays moist — for at least one week after you bake it, if you keep it in an airtight container.

In terms of flavor, this apple cake is the perfect sweet and spicy blend of sauteed apples and soft, chai-flavored sour cream cake — not too sweet, but definitely dessert and not coffee cake. The addition of chai is wonderful — it has a fascinating tea taste that adds a lot of depth to the flavor. This is a cake with a little something extra… one of those cakes that if you make it, people will taste it and say “What is that…. mmm, whatever it is, it’s good.”

That’s what I said, anyway!

Chai-Spiced Apple Cake

Chai-Spiced Apple Cake

Inspired by Ezra Pound Cake and Joy the Baker

Chai-Spiced Apples

  • 2 tart apples (around 1 pound), peeled, cored and sliced
  • 2 tablespoons butter
  • ¼ cup chai tea latte concentrate
  • 2 tablespoons brown sugar

Chai-Spiced Sour Cream Cake

  • 12 Tablespoons butter, at room temperature
  • 1 cup packed brown sugar
  • 1 teaspoon ground cinnamon
  • 1/3 cup chai tea latte concentrate
  • 4 egg yolks
  • 1 ¾ cups flour
  • ½ teaspoon baking powder
  • ¾ teaspoon baking soda
  • ½ teaspoon salt
  • ½ cup plus 1 Tablespoon sour cream
  • ¼ cup cinnamon sugar (whisk together around ¼ cup white sugar and ¼ teaspoon cinnamon)

Preheat the oven to 350 degrees F and place a rack in the center of the oven.  Spray a 9-inch spring-form pan with nonstick cooking spray.

First, make the apples: sauté apples in 2 tablespoons butter for approximately 2 minutes in a small sauté pan. Add brown sugar, stir to combine. Add chai concentrate, cover and continue to cook for 2 more minutes. Remove cover, stir to combine. Pour into a plastic bowl (with juices) and set aside to cool.

Then make the cake:  Cream the butter, sugar, cinnamon and chai mix in a stand mixer fitted with the paddle attachment until the mixture has lightened significantly in color and is fluffy. Stop the mixer occasionally to scrape down the sides of the bowl. It may take 6 to 8 minutes, but keep beating until the mixture is light in hue and very fluffy.

Add the egg yolks one at a time, and beat between additions until the batter is fluffy and glossy.

While all that beating is going on, whisk together the flour, salt, baking powder and baking soda in a separate bowl.  With the mixer set on low speed, add half of the dry ingredients to the batter.  Mix a few times until no flour streaks remain.  Add the sour cream all at once and mix on low just to incorporate.  Add the rest of the dry ingredients and mix on low just until no traces remain.

Stir the cooked apples once to coat them in the sautéing liquid, then drain the leftover liquid. Fold the apples into the batter with a rubber spatula.  The cake batter will be thick, but don’t fold too many times or you’ll smash the air out of it (all that air you put in during all that beating).

Spread the cake batter into the prepared pan and distribute evenly (I used an offset icing spatula to get it even).  Take a knife and run it in a singular circular motion through the batter 1-inch from the edge of the pan.  This will help the cake to rise evenly.  Sprinkle the cake with the cinnamon sugar and bake for 50-60 minutes or until a toothpick inserted in the center of the cake comes out clean.  Allow to cool for 10 minutes before removing the sides of the spring form pan.

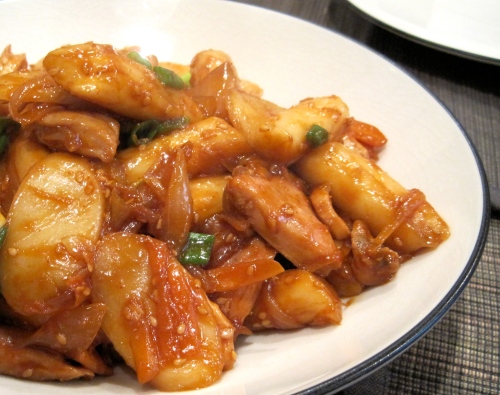
There’s a lot of ways to spell this dish in English — and all of them are awkward — but no matter how you spell it, the eating is good! This is one of the first Korean dishes I ever tried, and I immediately fell in love. The dish itself is a really simple stir fry that showcases the most fundamental, amazing Korean flavor combinations: garlic, red pepper, sesame, and a little sweetened soy sauce.

To help break down the awkwardly spelled name (not surprisingly, the Korean alphabet is just so much better at spelling out Korean food words…), let’s begin with the star of this show: dduk. “Dduk” are Korean rice cakes, but as this post points out, that term really doesn’t describe anything about dduk — the chewy, pillowy texture, their use in savory dishes, the sense of satisfaction you get from biting into a hot, flavorful piece of dduk, etc. Dduk is just comfort food to me — and it will be for you, too, if you try it! The post I referenced above say they are equivalent to a Korean version of the Italian gnocci; a good American equivalent might be dumplings. You know, the kind of dumplings your great aunt puts in chicken n dumplings, or that your brother orders at the Cracker Barrel (“Yes, I’ll have chicken n dumplings, with a side of chicken n dumplings, and another side of chicken n dumplings”).

Maybe that’s just my family, though.

Speaking of my family, that’s where this recipe comes from — my sister-in-law, the first (and yet, not the last) source of all things good and Korean in my life. I requested she make this a lot when I used to live with her and my brother, and she recently passed on the recipe, which she had conveniently already worked up to make it totally clear to non-Koreans.

In terms of actually locating and purchasing dduk, I really think it will be at any Asian market you visit. Dduk comes in many shapes, but you can buy whatever shape you can find — long cylinders, short cylinders, discs, etc. — and if you need to, you can cut them to a bite-sized length after they boil.  You’d probably have the best luck in a Korean grocery, but Chinese would do as well, and I wouldn’t say no to trying a Japanese market. Head to the freezer section; somewhere in the midst of all those frozen dumplings, you should find clear, plastic, occasionally shrink-wrapped packages of frozen dduk goodness. When I buy my next pack, I’ll take a picture of it so you can see.

Incidentally, it’s traditional for Korean (and Chinese?) people to eat dduk to celebrate the New Year, which is right around the corner! Dduk gook (soup) is actually what is traditional, but I like to feel this is close enough 🙂 Give it a try — and let me know how it goes!

Ddukbokki — serves four

Hannah Croasmun

Ingredients

  • 1 lb. dduk
  • 2 tablespoons neutral cooking oil (peanut, canola, veggie, etc.)
  • 1/3 lb. beef or chicken, cut into thin strips
  • 1 small onion, sliced
  • 1 small carrot, julienned
  • 1 tablespoons brown sugar
  • 3 tablespoons soy sauce
  • 1 teaspoon minced garlic
  • 3 green onions (cut into 2” long pieces)
  • 2 tablespoons sesame oil
  • 1 1/2 tablespoons toasted sesame seeds
  • 1 1/2 tablespoons gochoojang (Korean red pepper paste, available in Asian groceries). Add this carefully and to taste, since it can be really spicy!

In a large saucepan, bring water (around a liter and a half)  to a boil. Add the rice cake. Boil for 2 minutes, then drain and rinse them in cold water (in a colander, like pasta), and cut into 3” lengths (if necessary), set aside.

Heat cooking oil in a large skillet or wok over medium heat. When oil is hot, stir-fry beef or chicken until done. Add carrot strips & onion, stir-fry until tender. Turn heat down a bit, then add the dduk and cook for a minute.

Add the soy sauce, sesame seeds, sugar, garlic, and gochoojang. Stir to combine. Add green onions, sesame oil, and toasted sesame seeds.

If you’re still interested, I found another ddukbokki post here, which points out how quick and easy this totally satisfying dish is to make!

One of my favorite parts about living in Mexico was… the food. Not surprising, if you know me, but at least two parts of my Mexican-food-in-Mexico experience are worth mentioning. First: Mexican food in Mexico has almost no relationship to most Mexican food in the States. OK, maybe that’s being harsh… but most Mexican food in the Midwest, at least, derives its flavor from heaps of greasy cheese. Mexican food as I experienced it in the homes of my friends as well as the plentiful food carts serving drool-worthy tortas, tamales, and above all tacos (always soft, whether made with corn or flour tortillas), is intensely flavorful, not intensely oily. The flavor punch is delivered not only by spice, but also by citrus (lime, usually), cilantro, slow-cooked meats of all kinds, and raw onions (which, not by accident, are also good for your digestion). I could go on and on… but I’ll save most of this rant for another post. Suffice it to say that while this kind of food can be found in the U.S., it’s not going to be at any place with a drive-through window or a sombrero-wearing waiter trying to embarrass you on your birthday.

I bet your wondering what all this has to do with the very enticing muffin pictured above. Let me proceed quickly to point #2 about real Mexican food: Mexican chocolate. The first time my host mom made me Mexican hot chocolate, I was hooked. Mexican drinking chocolate is as spicy as it is sweet, and the spice gives it an exotic taste that is just difficult to put your finger on. The spicy-sweet richness is just plain seductive. You can actually buy Mexican chocolate in most grocery stores nowadays, but since that chocolate is for drinking and this blog is about baking, I’ve been trying to think of ways to bring this awesome flavor combination to you all.

This (finally) brings us to the muffins. A good start on the Mexican chocolate flavor combination is to add some cinnamon to dark chocolate. For months now, I have been trying every recipe I can find that combines chocolate and cinnamon, but to be honest, no recipe has gone far enough to suit my taste buds! One teaspoon of cinnamon in a cake that fits a 9×13 pan isn’t going to cut it. So I struck out on my own, and modified a chocolate chip muffin recipe that I found on Recipezaar to accommodate not only extra cinnamon in the batter, but also a cinnamon-sugar-chocolate chip layer midway through the muffin and the same combination on top.

The results were awesome! The cinnamon taste is much more present than in any recipe I have tried thus far, but isn’t overwhelming at all. The cinnamon-sugar topping is really pretty and adds that spicy-sweetness that I just really crave! The only surprise (there are always surprises when you experiment, I’m finding) is in the texture, which is more on the sturdy end, rather than the tender end. It’s a muffin — not a cupcake.

This isn’t the end of this experiment. To get a real Mexican flavor combination, you’d need to combine chocolate, cinnamon, and cayenne pepper, and it’d need to be a lot more chocolatey than this muffin. But I feel we’re off to a great start with these!

Cinnamon Chocolate Chip Muffins

Makes 1 dozen muffins

Ingredients

  • ¼ cup granulated sugar
  • 1 teaspoon ground cinnamon
  • 2 cups all-purpose flour
  • 1/3 cup light-brown sugar, packed
  • ¼ cup granulated sugar
  • 1 teaspoon baking powder
  • 1 teaspoon baking soda
  • ¼ teaspoon salt
  • ½ teaspoon ground cinnamon
  • 2/3 cup milk
  • 1/2 cup butter, melted and cooled
  • 2 eggs, lightly beaten
  • 1 teaspoon vanilla extract
  • 1 ¼ cups semi-sweet chocolate chips

Preheat oven to 400°F. Grease (or line) twelve muffin cups.

To make cinnamon sugar: in a small bowl, stir together ¼ cup granulated sugar and 1 teaspoon ground cinnamon.

In a large bowl, whisk together flour, 1/3 cup brown sugar, ¼ cup granulated sugar, baking powder, salt, and ½ teaspoon ground cinnamon.

In another bowl, whisk together milk, eggs, butter, and vanilla until blended.

Make a well in center of dry ingredients, then add the milk mixture and stir just to combine.

In each muffin cup, spoon 1-2 tablespoons batter. Cover with 1 teaspoon cinnamon sugar and a few chocolate chips. Then repeat the layer: top each muffin cup with remaining batter, cinnamon sugar, and chocolate chips. Fill each muffin cup only 2/3 to ¾ of the way to the top.

Bake muffins for 15-20 minutes or until a cake tester inserted in center of one muffin comes out clean. Remove muffin tin to wire rack, cool for 5 minutes. Remove from tins to finish cooling.

That’s the stuff.

The long-awaited (ok, just since yesterday) sequel to our delicious but ugly quesadillas, this fried rice is definitely a winner. As I said yesterday, a lot of the credit for this dish goes to Sean, who is an invaluable inspiration in the kitchen as he is totally unhampered by self-doubt and irrational food fears. He also has a unshakeable belief that everything goes in fried rice, so when we found ourselves with more shrimp than quesadilla fixings, he immediately suggested fried rice. Given that I had reduced the amount of shrimp and increased the amount of liquid when I made the shrimp (this is reflected in my recipe posted yesterday, if you’re interested), we had a lot of yummy juices with which to flavor the rice. Another chipotle pepper took the flavor the rest of the way — it was a huge success.

Several notes on frying rice — (1) as everyone will tell you, old rice is better than fresh rice. Fresh rice is too moist and will deconstruct in your pan. Sometimes you just don’t have rice lying around, though, and you might have to do with freshly made rice, which presents a real problem. (2) Rice itself varies a lot in consistency (how sticky, how wet, how dry…) so generic advice about frying rice and how long it should take, etc., is sometimes just not helpful. (3) Without using a lot of oil (or an oil-seasoned wok), sometimes “fried rice” turns into “rice that is heated through with other ingredients.” I suspect that a very effective way to get a nice “fry” on your rice is to use more hot oil, but that obviously isn’t too good for you. Considering all these factors, frying rice is not really as simple as people who have been doing it their whole lives make it seem.

I have fried a lot of rice lately, and below is my best method for getting a nice fried rice that’s not terrible for you, mushy, or simply rice re-heated. This time, I had some rice in our rice cooker still warm, so I took it out before chopping the other ingredients and threw it in the fridge. I flipped it once, to let it all cool down and steam out a bit. This helped a lot. The key while stir frying is to not stir too much while the rice is still moist. It will lose moisture and soak up oil/flavor as it stays in the pan, as long as you don’t mash it and mix it a ton before it has a chance to steam out. Let it get a little firmer and crustier before adding the finishing touches — you’ll be glad you did!

Chipotle Lime Shrimp Fried Rice

The Parks

Ingredients

  • 1 tablespoon canola oil
  • 1 onion, chopped
  • 1/2 cup julienned carrots
  • 2 cups day-old rice, preferably cold
  • 1/2 lb (1/2 recipe) chipotle lime shrimp w/ reserved juices
  • 1-2 chipotles en adobo, chopped (stick with one if you don’t like things too spicy!)
  • 2 eggs
  • 1/4 cup cilantro, chopped

Heat oil in a large skillet or wok over medium-high heat. When the oil is hot, add the onions and carrots. Stir fry until mostly soft, then add rice. Stir fry to break up clumps, but don’t overdo it or your rice will break apart or get mushy. Add the reserved juice from the shrimp and the chopped chipotle, stir fry to mix. Spread the mixture over the bottom of the pan in a single, even layer.

This is when you can let your rice hang out in the skillet for a few minutes, especially if your rice is fairly fresh. Let the moisture steam out and the rice get a nice crust before flipping it over and doing the same on the other side. How long you let it sit depends on your pan, the age of your rice, the heat of the burners, etc. Just don’t mess with it a ton… and conversely, don’t let it burn.

When rice is getting a little crustier, add the shrimp and stir to mix. Make two “wells” in the rice and crack and egg in each. Let it rest 30 seconds, then break the yolk and stir the egg up a bit, still keeping the egg in the wells. Cover the wells with rice and let stand for up to one minute.

Stir fry to mix the egg in, then remove from heat add some cilantro. Serve warm, topped with the remaining cilantro.

This post is mostly a precursor to tomorrow’s, but it shouldn’t be. That is, this is one of those times that a dinner, made mostly from someone else’s recipe, rolled into the next night’s dinner, in an original creation — again owing to my courageous and creative husband! This post commemorates the first dinner, because without it, we wouldn’t have stumbled on the second one…. and really, on its own, this is a fantastic and yummy meal! We were just so excited about the results from the second one that this got a little overshadowed.

That, and the pictures kind of stink….

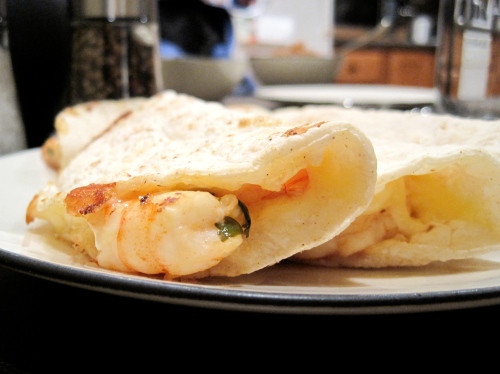
Alright already, before you all stop reading and just come back tomorrow, here’s the recipe for our Chipotle Lime Shrimp Quesadillas. The shrimp come from Ezra Pound Cake (again….. it’s a great site, what can I say?) and I barely changed the recipe (more lime juice, more adobo, de-tail shrimp, etc.). Some authentic mexican cheese and the extra liquid from the shrimp made the quesadilla version of these already yummy shrimp top-notch. We’re lucky to live in a hispanic neighborhood where such cheese is readily available. It’s one of the foods I loved most in Mexico City!

Come back tomorrow to see incarnation #2 of these great shrimp!

Chipotle Lime Shrimp Quesadillas — serves 2, with leftover shrimp for the next day

Chipotle Lime Shrimp

from Ezra Pound Cake, who got it from Cooks Illustrated

  • 2 tablespoons vegetable oil
  • 1 pound 21/25 shrimp, peeled, deveined, de-tailed
  • 1/4 teaspoon salt
  • 1/4 teaspoon ground pepper
  • 1/8 teaspoon sugar
  • 1 chipotle chile in adobo, minced
  • 1 tablespoon adobo sauce
  • 4 teaspoons brown sugar
  • 3 tablespoons lime juice (from two small, really juicy limes)
  • 2 tablespoons chopped cilantro

To make the glaze: Stir together chipotle chile, adobo sauce, brown sugar, lime juice, and cilantro in small bowl.

Heat 1 tablespoon oil in 12-inch skillet over high heat until smoking, Meanwhile, toss shrimp, salt, pepper, and sugar in medium bowl. Add half of shrimp to the pan in single layer and cook until spotty brown and edges turn pink, about 1 minute. Remove pan from heat; using tongs, flip each shrimp and let stand until all but very center is opaque, about 30 seconds. Transfer shrimp to large plate. Repeat with remaining tablespoon oil and shrimp; after second batch has stood off heat, return first batch to skillet, add chipotle mixture, and toss to combine. Cover skillet and let stand until shrimp are cooked through, 1 to 2 minutes. You’ll have some liquid left — this is the good stuff, don’t drain!

Quesadillas

  • 1/2 pound (1/2 recipe) chipotle lime shrimp with reserved liquid, above
  • 2-3 cups shredded mexican cheese (queso chihuahua or oaxaca are my favorites… manchego is also nice, and let’s be honest, monterey jack is just fine too)
  • 10 small corn tortillas

Heat two tortillas at a time (or however many fit in your pan) in a dry skillet over medium heat, both sides (heating the tortillas through before adding cheese is a must! no more chewy tortillas!). Add a small handful of cheese to one half of each side, toss on three or four shrimp, a spoonful of lime-chipotle liquid goodness, and a little more cheese. Fold, flip, and heat until cheese is melted and gooey. Repeat until all quesadillas are made.

Enjoy!

Andes Cocoa Brownies

Andes Cocoa Brownies

I grew up on cocoa-based chocolate treats. My favorite cookies while I was growing up were these cocoa drops that my mom made — chewy, puffy, soft, and really chocolatey but not rich. Someday I will definitely make and post them — they are a taste of home for me.

It wasn’t until I really started baking and experimenting a lot — maybe a year ago, now — that I started making a lot of recipes that use melted chocolate as a base for cakes, brownies, and even chocolate cookies. I knew how to temper chocolate, thanks to the number of chocolate-dipped candies that my mom and I make every year for Christmas (it’s an epic annual process, maybe this year we’ll document it), so for a while I happily melted and cooled and incorporated into batters for baked goods of all sorts.

Recently, though, I have been wondering what, exactly, is wrong with cocoa? I like the dusty, almost raw chocolate flavor it imparts. Buying a ton of chocolate (the higher the quality, the better, it seems) is expensive. And if I have gotten ahold of a high-quality chocolate bar, you know what I’m going to do? Eat it. That’s right. Not melt it, temper it, or coddle it until it’s totally lost its character and is ready to be incorporated into whatever chocolate creation is next on my list.

Andes Cocoa Brownies

Ok, ok….. there are some times when using high-quality, tempered chocolate is a good thing (see the Chocolate Espresso Fudge Cake, for example). But sometimes I like the ease and comfort of just using cocoa. And it tastes a whole lot like home!

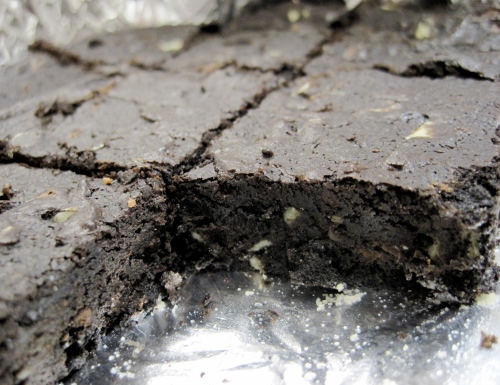
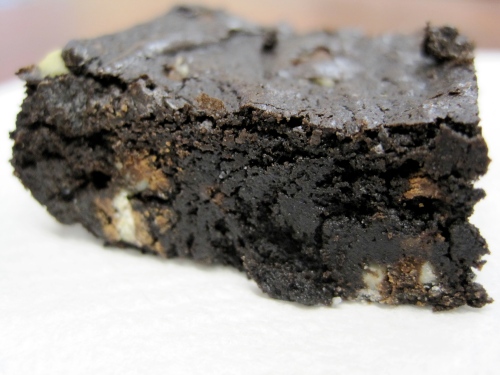
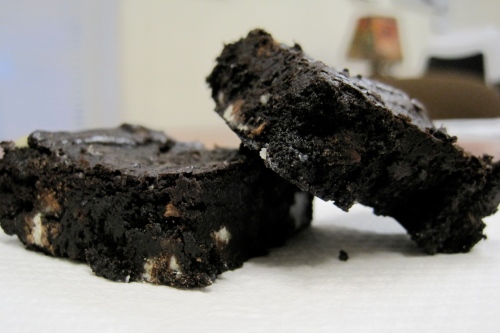
All this to say, that when I saw cocoa brownies on smitten kitchen, I knew I’d have to try them. These are really low-maintenance, rich brownies — look at how dark they are in the pictures! With only a quarter-cup of flour, these babies are intensely fudgy, which is my favorite kind of brownie. I had some leftover Andes baking pieces that I added (you could use regular Andes mints and break them up). The mint was fantastic, and complimented the dark cocoa flavor perfectly. Speaking of cocoa, I used Hershey’s Special Dark. I read somewhere that it is half dutch-processed, half regular. It certainly is very dark, and gave the brownies an intense flavor and that beautiful black color. This recipe prove that cocoa-based treats can be just as chocolatey as chocolate-based ones — if not more than!

I made these for an info session I had for some students at work, and they loved them. I left the rest out for my colleagues the next morning, and by noon they were reduced to crumbs (who eats brownies at 10am? A lot of people I work with). Try them!

Andes Cocoa Brownies

Andes Cocoa Brownies
Adapted from smitten kitchen, who adapted from Alice Mendrich’s Bittersweet

Makes 16 larger or 25 smaller brownies (I went with the 25-count size)

Ingredients

10 tablespoons (1 1/4 sticks, 5 ounces or 141 grams) unsalted butter
1 1/4 cups (9 7/8 ounces, 280 grams) sugar
3/4 cup plus 2 tablespoons (2 7/8 ounces, 82 grams) unsweetened cocoa powder (natural or Dutch-process)
1/4 teaspoon salt
1/2 teaspoon pure vanilla extract
2 large eggs, cold
1/2 cup (66 grams, 2 3/8 ounces) all-purpose flour
2/3 cup Andes baking pieces or broken Andes mints (optional)

Position a rack in the lower third of the oven and preheat the oven to 325°F. Line the bottom and sides of an 8×8-inch square baking pan with parchment paper or foil, leaving an overhang on two opposite sides.

Combine the butter, sugar, cocoa, and salt in a medium heatproof bowl and set the bowl in a saucepan of barely simmering water. Stir from time to time until the butter is melted and the mixture is smooth and hot enough that you want to remove your finger fairly quickly after dipping it in to test. Remove the bowl from the skillet and set aside briefly until the mixture is only warm, not hot. It looks fairly gritty at this point, but don’t worry — it smooths out once the eggs and flour are added.

Stir in the vanilla with a wooden spoon. Add the eggs one at a time, stirring vigorously after each one. When the batter looks thick, shiny, and well blended, add the flour and stir until you cannot see it any longer, then beat vigorously for 40 strokes with the wooden spoon or a rubber spatula. Stir in the Andes, if using. Spread evenly in the lined pan.

Bake until a toothpick plunged into the center emerges slightly moist with batter, 20 to 25 minutes is Medrich’s suggestion but it took me at few minutes longer to get them set. Let cool completely on a rack.

Lift up the ends of the parchment or foil liner, and transfer the brownies to a cutting board. Cut into 16 or 25 squares.

Andes Cocoa Brownies

Jen’s Fish-Flavored Pork

Just pictures today — I can’t take any kind of credit for this recipe, but I had to write about it because we seriously loved it that much! I have been on a real Chinese food kick lately (a couple of friends are coming over tonight and when I said we’re having Chinese food for dinner, one of them asked “When was the last time we had non-Asian food?” and I have to admit, it was a fair question). I think my enthusiasm has to do with the shock and awe I produce (in myself) by actually being able to produce food in my own kitchen that tastes Chinese. It still amazes me that by following a few basic principles and sticking to some flavor profiles (pork + ginger, for example), I can produce something Chinese-tasting!

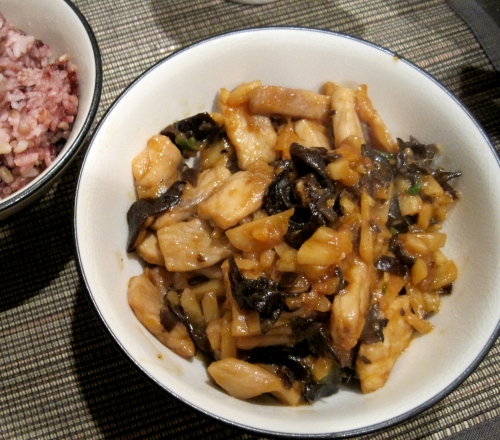
Anyway, since I’m in the middle of this Chinese cooking phase, I tend to scour use real butter for Jen’s Chinese recipes, which always turn out for me. I found this recipe with the auspicious (or suspicious) name Fish-Flavored Pork and learned something new about the dried mushrooms I have been using for a few months now… they’re not mushrooms. They are tree ears, or wood ears, or cloud ears, depending on who you ask. The package I bought says “Dried Black Fungus”…. I naturally assumed dried black chinese mushrooms, which is what I needed, but alas…. when rehydrated, they are thin and chewy and have a distinct flavor.

For months, I basically ignored this fact (the fact that somewhere in the back of my mind, I knew these weren’t really mushrooms), and continued using the suspicious black fungus whenever I needed dried mushrooms. For the most part, they filled that role really well, and actually the distinct texture is surprisingly nice, especially in soups where a little added texture is welcome. But when I recognized them in Jen’s post, I realized I had found them a new home…… a dish where they really belonged.

This is one of those dishes that takes 10 minutes of prep and 5 minutes to cook — the kind of thing we make all the time for dinner. A bowl of rice, a few Korean banchans (veggie side dishes), and it’s done: you have dinner. Head over to use real butter for the recipe — and remember, you actually can make Chinese food at home!